Many web hosting control panels or cPanel come with automated WordPress installation script installers, such as Softaculous and Fantastico. If yours does not, you will need to install WordPress in cPanel manually. Below are steps to install WordPress in cPanel manually.
How to install WordPress in cPanel manually
Unlike Softaculous Apps Installer, installing WordPress in cPanel manually involves a few more steps, yet some users prefer this method.
By manually installing WordPress in cPanel or any web host control panel, you have the choice to create a website or use the software to handle your website development in a safe place since it’s installed locally.
To install WordPress in cPanel manually, you need to download and upload the WordPress files, create a database and install WordPress. You can also hire experts on Oziconnect to install and develop a WordPress site for your need.
Let’s get started:
Also read: How To Install WordPress using Softaculous Apps in a Web Host – 5 Steps & Examples
#1. Download WordPress
Download the most recent official version of the CMS from the WordPress website. Download the zip file, and save it to your desktop computer.

Once the zip file has been downloaded, the next step is to upload it to the server directory and extract the entire archive. Note the location of the extracted content, and upload it to your web server.
Also read: How to Track Website Visitors to Your WordPress Site
#2. Upload WordPress Install Script to Server
Follow these steps to upload the downloaded WordPress archive to your cPanel account.
Step 1. login to your cPanel account
To log in to your cPanel, use the login credentials provided by your hosting provider. Click on the URL (something similar to https://example.com/cpanel), enter the username and the password, then click on the login button. See the screenshot below;

Step 2. Locate the Files section on the cPanel dashboard
After successful login to the cPanel dashboard, locate the Files section and click on the File Manager.

Step 3. Open the public_html directory
The public_html directory is your web root, the directory in which you want to store all your websites.

Step 4. Upload the files inside the downloaded WordPress zip file

Upload all the files of the WordPress folder, but not the folder itself. After the upload, all WP files and subfolders should reside in the public_html or in a sub-directory you want the website, eg: www.example.com/blog.
For example, if you want the WordPress site in your root domain, eg: www.example.com then upload the files in the public_html, otherwise, upload them inside the sub-directory you want your website on, eg: public_html/blog
Step 5. Extract the Uploaded WordPress archive
After you have extracted the WordPress installation archive, go ahead and delete the zip file from your web server. Right-click on the zip file and hit Delete.
Make sure the extracted files are moved to the public_html directory or to the directory where you want the website. Because WordPress websites require a database to store data, the next stage is to create a database.
#3. Creating a MySQL Database and Database User
To create a database for your WordPress site, go back to your cPanel dashboard to locate the cPanel’s MySQL Database Wizard under the Databases section.

Step 1. Give a name to your database
The first step is to create a Database. Name your database. Your hosting account name will prepend it. We’ll use the database name later, so save it for now and then click on the Next Step button.

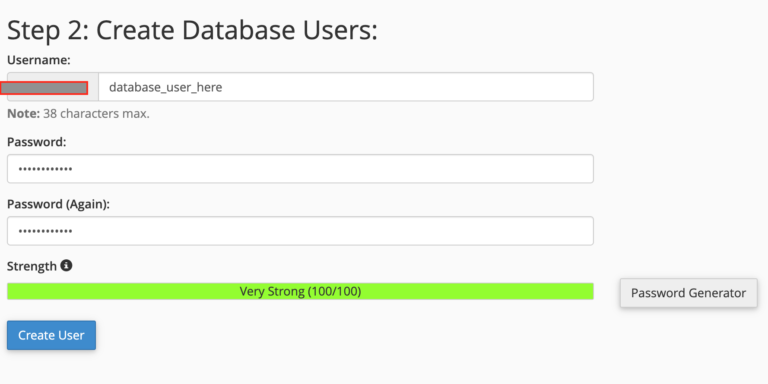
Step 2. Enter your database username and password
Next, the wizard will prompt you to create a database user. Enter a username and a password. Ideally, you want the strength meter to turn green and read Very Strong, indicating that the password is secure. Your hosting account name will prepend the username as well.

Again, we’ll be using these credentials later, so save them for now.
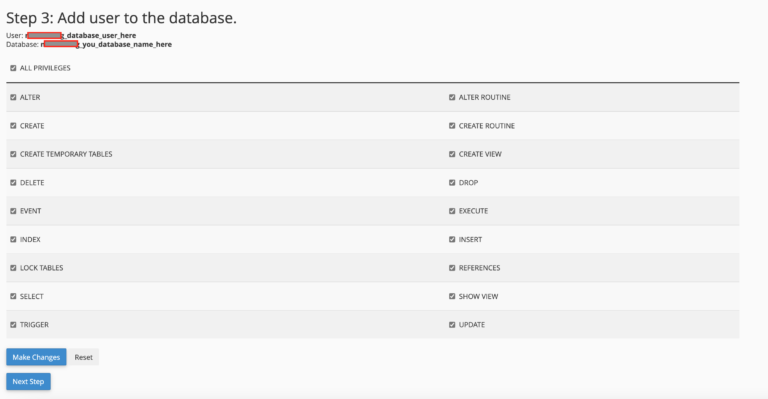
Step 3. Assign User to Database and Assign Permissions
The newly created database user doesn’t have access to the database we created earlier, so we need to assign privileges, which is the final step of the database creation process.
The wizard will prompt you to assign database privileges when you click on the Create User button in the above screenshot. So, check the All Privileges checkbox and click on the Make Changes button.

You’re done creating the database.
To verify you assign the database user to the correct database correctly, click to view databases. There should be a database and a privileged user assigned to the database.
Then, click on the Return Home button to go back to the cPanel dashboard.


Comment on “How to install WordPress in cPanel manually – 5 Steps and Examples”